Redis, a powerful and open-source in-memory data store, is renowned for its lightning-fast performance and versatility. Whether you’re developing applications, managing caches, or implementing messaging systems, Redis has you covered. This guide will walk you through the process of How to Install Redis on Debian 11 Server, equipping you with the tools to harness its capabilities for your projects.
Debian 11 : Make sure you have a clean installation of Debian 11 Server. To set this up, follow our guide Initial Setup Debian 11 Server: Secure and Efficient. You can deploy this on a physical machine or a virtual environment like VMware or VirtualBox.
A stable internet connection for package downloads
Familiarity with basic Linux terminal commands
Install Redis on Debian
Follow the next steps to install Redis on your Debian 11 Servers
Step 1: System Update
Begin the installation process by ensuring that your system’s package repositories and installed packages are up to date. Execute the following command to update:
After adding the required respiratory, Use the following command to install Redis:
samm@redis:~$ sudo apt-get update
samm@redis:~$ sudo apt-get install redis-server
Step 5: Start and Enable Redis
Following the installation and security configuration, verify the proper functioning of Redis. Initiate the Redis service to ensure its operational status:
Dec 14 22:12:46 redis systemd[1]: Starting Redis Server 7.0.9...
Dec 14 22:12:46 redis systemd[1]: Started Redis Server 7.0.9.
To confirm the installation, we will check the version of Redis using the command:
samm@redis:~$ redis-server -v
Redis server v=7.0.9 sha=00000000:0 malloc=jemalloc-5.2.1 bits=64 build=3af367a78d5e21e9
Step 6: Secure Redis
While Redis offers remarkable performance, its default configuration can potentially expose your system to security risks. To enhance security, modify the Redis configuration file:
samm@redis:~$ sudo vi /etc/redis/redis.conf
Find the line containing bind 127.0.0.1 and change it to bind 127.0.0.1 ::1. This modification restricts Redis to only listen on the local interface.
# By default, outgoing connections (from replica to master, from Sentinel to
# instances, cluster bus, etc.) are not bound to a specific local address. In
# most cases, this means the operating system will handle that based on routing
# and the interface through which the connection goes out.
Save the file and exit the editor.
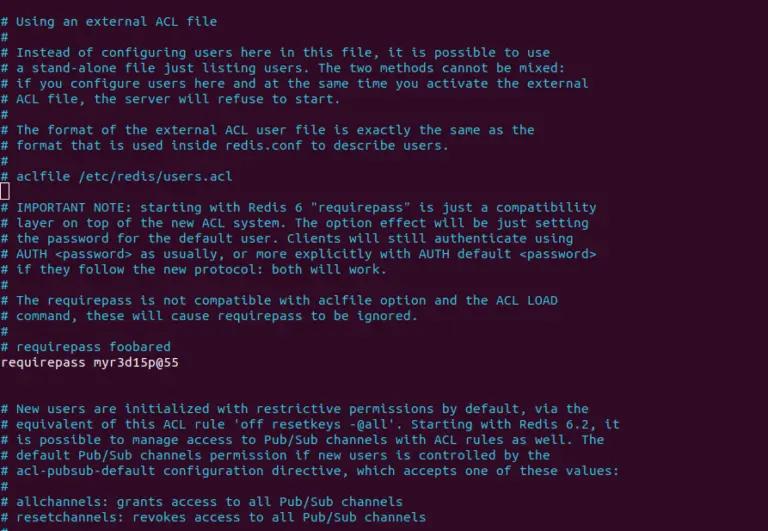
To enforce authentication, locate the requirepass directive and set a strong password. In the same file “/etc/redis/redis.conf”, look for the “requirepass” line and write your password in front of it:
samm@redis:~$ sudo vi /etc/redis/redis.conf
.....
# AUTH <password> as usually, or more explicitly with AUTH default <password>
# if they follow the new protocol: both will work.
#
# The requirepass is not compatible with aclfile option and the ACL LOAD
# command, these will cause requirepass to be ignored.
4412:M 08 Dec 2022 23:44:30.621 * monotonic clock: POSIX clock_gettime
4412:M 08 Dec 2022 23:44:30.621 * Running mode=standalone, port=6379.
4412:M 08 Dec 2022 23:44:30.621 # Server initialized
4412:M 08 Dec 2022 23:44:30.621 # WARNING overcommit_memory is set to 0! Background save may fail under low memory condition. To fix this issue add 'vm.overcommit_memory = 1' to /etc/sysctl.conf and then reboot or run the command 'sysctl vm.overcommit_memory=1' for this to take effect.
4412:M 08 Dec 2022 23:44:30.621 * Loading RDB produced by version 7.0.5
4412:M 08 Dec 2022 23:44:30.621 * RDB age 0 seconds
4412:M 08 Dec 2022 23:44:30.621 * RDB memory usage when created 0.82 Mb
4412:M 08 Dec 2022 23:44:30.621 * DB loaded from disk: 0.000 seconds
4412:M 08 Dec 2022 23:44:30.621 * Ready to accept connectionssamm@redis:~$ sudo tail -f /var/log/redis/redis-server.log
4412:M 08 Dec 2022 23:44:30.621 * monotonic clock: POSIX clock_gettime
4412:M 08 Dec 2022 23:44:30.621 * Running mode=standalone, port=6379.
4412:M 08 Dec 2022 23:44:30.621 # Server initialized
4412:M 08 Dec 2022 23:44:30.621 # WARNING overcommit_memory is set to 0! Background save may fail under low memory condition. To fix this issue add 'vm.overcommit_memory = 1' to /etc/sysctl.conf and then reboot or run the command 'sysctl vm.overcommit_memory=1' for this to take effect.
4412:M 08 Dec 2022 23:44:30.621 * Loading RDB produced by version 7.0.5
4412:M 08 Dec 2022 23:44:30.621 * RDB age 0 seconds
4412:M 08 Dec 2022 23:44:30.621 * RDB memory usage when created 0.82 Mb
Redis typically uses port 6379 for communication. To allow traffic on this port, run:
samm@redis:~$ sudo ufw allow 6379
Rule added
Rule added (v6)
Once you’ve configured your desired rules, enable UFW to start enforcing them:
samm@redis:~$ sudo ufw reload
Once the firewall has
Step 10: Access Redis
Open a terminal on your redis server and you client machine to access Redis using the redis-cli tool. You can enter the following command to start the Redis command-line interface:
From Local Server
samm@redis:~$ redis-cli -h 127.0.0.1 -p 6379 ping
PONG
samm@redis:~$ redis-cli -h 127.0.0.1 -p 6379
127.0.0.1:6379> exit
From Remote Server
$ redis-cli -h 172.32.1.90 -p 6379 ping
PONG
$ redis-cli -h 172.32.1.90 -p 6379
172.32.1.90:6379> exit
How to uninstall Redis on Debian 11
For uninstalling Redis from Debian 11, leverage the apt package manager along with its autoremove option:
In conclusion, install Redis on Debian 11 empowers you with a high-performance, in-memory data store that has the potential to revolutionize your applications and systems. Following the comprehensive steps outlined in this guide, you’ve successfully installed Redis, secured it, and begun exploring its fundamental features.


